
For a multi site client, tengoPOS enables detailed recording of the movement of stock from one site to another. There are two different ways to transfer, one is Informal, i.e. after the press of a few buttons on one screen, stock is transferred from one previously defined stock location (listed under \\LLOC) to another. The other requires the sending site to complete certain functions, and the receiving site to acknowledge receipt of the goods, before the items move in the till records. The second way we will call Formal.
Informal
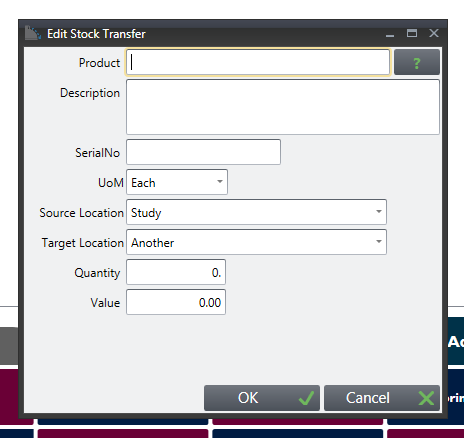
Type \\STRA and enter, the following screen appears.
Identify the product by typing in PLU or part of it then press “?”, or scan in a bar-code
Product details will appear, simply enter the source and destination locations from the drop-down menus, type in the quantity (Value will update automatically based on what the system knows about the cost price)
Press OK, and that number of the product will move in the records. This can be confirmed by looking up the product (\\PROD, unless you have a button on the till called Edit Products) the View Stock.
Formal
- On POS till, Type \\LTRA and Enter. In CRM, click Products tab on top line then Stock Transfers on the drop-down menu. The screen you then see is the same in both cases
- Previous transfers done this way are listed. Click Add+ bottom left of screen to record a new transfer
- In top panel, type –
- Your Reference (max 10 characters will be visible as the reference for the transfer later – leave this blank to get a unique ID generated by the system, or if you’re entering your own, ensure it’s not a reference you’ve used before), Source Location, Target Location (both from drop-downs, locations already specified for your organisation) and Transfer (Drop-down opens list of options already in for you, which are recorded in \\LLOC, locations. When added as “New” a location, e.g. Delivery Van 1, can be set as a “Transfer” location from the options)
- Note the Dispatch date will populate with current date when you click Dispatch later, and the Status will update as the transfer progresses.
- Click Add+ bottom left to add product. Type in PLU or part of and click “?”, or scan in bar-code. Input quantity to be moved, OK to save.
- More products can be added to the consignment by “Add+” of further lines.
- You can temporarily close the transfer by clicking Close, and open it again by clicking Edit. Information input will be saved.

In the example we are recording the Transfer of 5 white mugs on delivery van 1 from location “Warehouse” to target location “Another”
When everything is recorded, click Dispatch
On the list of Stock Transfers, the Dispatch date is now visible and the status has changed to Dispatched.
The transfer is then completed (i.e. receipted) at the Target Location once the goods have arrived there.
n.b. If the transfer is being recorded on POS tills at both ends, it is important that the stock location is set correctly on the till at both the Source and Target locations. In our example, the Stock Location on the machine used to initiate the transfer would be “Warehouse”, same as the Source location. Similarly at the Target Location, the Till will be set as “Another”. To check stock location on your machine, type \\TILL, hit Enter, current stock location set is about half way down the page.
In CRM, the machine setting (in this case on the Admin tab, Device Settings) is not so important. It makes sense that they should match, but the transfer can be recorded correctly whatever the stock Location setting of the machine used. This is because CRM is used more in a “Back Office” support role and could be portable, rather than tills which are in fixed locations.
At Target location –
- On a POS till, Type\\GOODS to open the Goods In front page. In CRM, on the Products tab drop-down, click on GoodsIn. Again from here the pages are the same –
- Click Transfers top of page, the consignment will be listed. Only un-receipted transfers are listed so it may be the only one
- Highlight the line and click Items, bottom right of screen
- Click Receipt All to acknowledge receipt of goods, then Complete, bottom right
- If you click Edit instead of Receipt All you can acknowledge receipt of only part of the consignment. If there were only 4 White Mugs on the van, the system allows you to receipt 4, and count 1 as Missing.

The goods have now been transferred. On the relevant Product Stock page (locate on Product Listing, then press Edit, hit Stock, or press View Stock) it will appear in the Stock Audit panel (bottom half of the page) for the two sites, Out at the Source location, and In at the Destination, with the narrative Transfer. Any difference between the number of items Dispatched and Received will be shown as an Adjustment.
n.b. On the Product page, View Stock is a function typically available to all levels of user, whereas Edit (from where it is also possible to view stock, but also amend product details) may well be restricted to Administrators or Managers only.