
Adding and Editing users (and reprinting/generating user barcode labels)
On the till under Admin, you will probably have a button called Edit Users, see below top left. If not, type \\LUSR in the input field and press Enter. These features will likely be restricted to Administrator till logons only.


You then get a list of all existing users, initially at the site your till is set as. For a multi site set up, tick the All Sites box top right and press Search bottom left, to expand the selection. If you have more than 200 users, you may have to narrow down the selection, e.g. by typing the surname of the person in the top Search box, then press the Search button.

Click on Add to add a user and you’ll get the screen below:
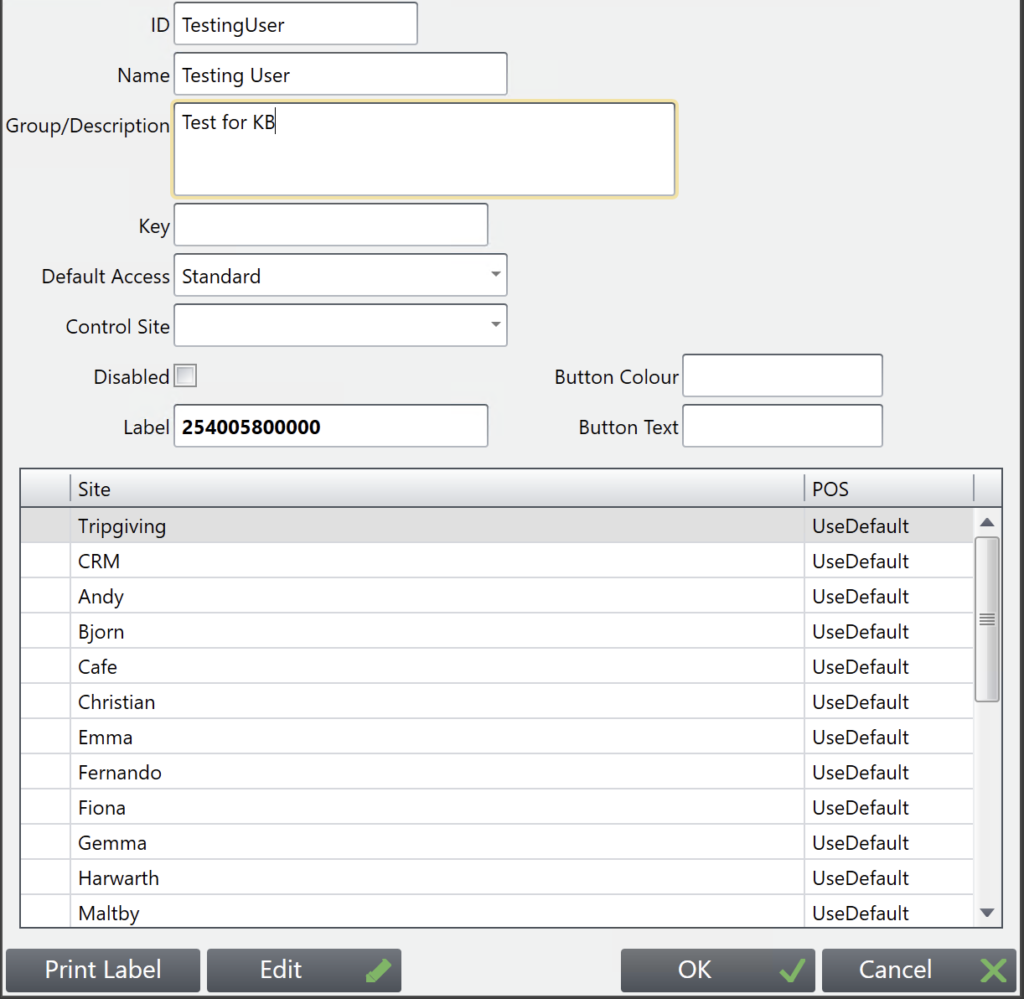
Here we are adding a new Standard User, Testing User.
- ID – Can be a payroll number or other employee ID, if you don’t have that entering FirstLast name is the most common, So JohnSmith for ‘John Smith’. The ID must be unique, as in you cannot have more than one JohnSmith ID, although you can have many John Smith’s in the name field.
- Name – Their name.
- Group / Description – Optional, if you want to add further detail about the user.
- Key – Is the password they can use to log in. Any combination letters / numbers / both. Letters are not case sensitive here. We recommend you leave this blank and use login barcodes as per ‘Label’ below.
- Default Access – Their access level from the drop down menu, which sets the user rights. Don’t set anyone as admin/administrator level who you don’t want to be able to change buttons or edit other key settings on the tills.
- Control Site – Usually their main place of work.
- Disabled – Tick this box and press OK to disable access for this user, e.g. they have left the organisation.
- Label – will show a bar-code label number if one has been printed. Press the Print Label button bottom left to print a label which will show their User ID (Fred S) and a bar code, which can then be scanned into the Log In screen, instead of typing in a password. You will have to have a connected Label Printer and a Scanner to use this function.
- Site – In a multi site organisation, you can set different access levels at different sites. The list contains all recorded sales sites for your organisation. Under the POS heading the word Use Default mean that unless it is changed, the user has the same access level that they have at their Control Site. These can be changed by highlighting the appropriate one and pressing Edit, so a user can have different access, or indeed no access, at other sites as required.
When complete, press OK and the details are saved.
Edit Users
On the List users page, Administrators can highlight the relevant user and press Edit to change / update details, e.g. –
- Disable the user
- Print more bar code labels (this can be done also from the main user listing page, just highlight the user and press Label, bottom right of screen)
- Change their password if it has been lost or compromised
- Change access levels…etc
Additional search terms; print off another user barcode, printing user labels, user logins, tengoPOS user rights, user levels, user access, editting users logins